WebLogic 12c server setup
Installing and
Configuring ADF development in weblogic 12c
In this practice we will go through the installing
the ADF and configuring the Domain for the web logic
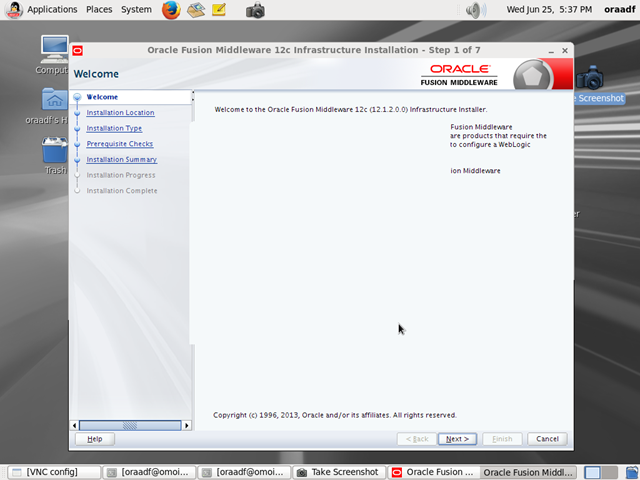
Step 1
Start the installer as the java -jar fmw_infra_121200.jar to install the ADF development it will install the web logic ..or if the web logic is already installed you can extend it
Step 1
Start the installer as the java -jar fmw_infra_121200.jar to install the ADF development it will install the web logic ..or if the web logic is already installed you can extend it
Step 2
Provide the Oracle Middle ware Home Location for the Installation
Provide the Oracle Middle ware Home Location for the Installation

Step 3
Select the Installation type if it is the dev instnace select the fusion Middle ware infrastructure with examples

Step 4
Once the Prerequisite check's had been completed successfully then proceed to the next step

Step5
Check the installation summary and save the response file

Step 6
Once all the installation Process had been completed successfully then Proceed to next step

Once the summary page click finish to finish the installation
After completing the installation now we need to proceed to creation of the RCU for the ADF development follow the steps in this post for creating the rcu http://orafapp.blogspot.ae/2014/06/creating-rcu-for-adf-development.html
After RCU creation we need to configure the weblogic Domain
Configuring
Domain in weblogic 12c
We need to run the config.sh to start the weblogic
Domain Configuration
Creating New Domain in weblogic 12c
for the ADF Development
Step 1
Click the create New Domain to start creating the new Domain and Provide
the location of the New Domain to be stored
The default of the New Domain will be
MW_HOME/user_projects/domains/<Domain_name>

Step 2
Select the Templates which is used for the Domain Creation .. for the ADF we need to Select Oracle Enterprise manager,which has dependency of Oracle JRF ,and weblogic Coherence , the Base server weblogic Domain will be the default Domain template

Step 3
Specify the location of the application location for the new Domain the path will be like
MW_HOME/user_projects/applications/<domain_name>

Step 4
Create the master username and password for the weblogi Domain .. this user will be acting as the super user for this Domain
Name:=<Name of the Super User>
Password:=<provide the Password for the user>

Step 5
Specify the Development or Prod Mode for the Domain

Step 6
Click the RCU for fill the data from the RCU
DBMS/Service:=Database service where the RCU had been installed
Hostname:=Database Sever Hostname
Port:=1521
Schema_name:=<DEV_STB> Scehma created during the Rcu
Password:=<schema password> the password specified during the rcu
installation
and click the get RCU Configuration for Username and Password


Check the information for the installer screen after clicking the get
RCU Configuration .. the test and bin is successfull proceed to next step
Step 7
If we have the Rac database as the data source then we need to Select
the tick box for the data source and then configure the data source for the RAC
database .. if it is single installation database proceed to the next
page

Step 8
check all the connections after configuring with the data
source

Step 9
If you decide to configure all admin server and Node manager
and Manged server and deployments and services then you can click all the four
or you can click the admin server and Managed server's Node manager will be
default configured and then deployments will be deployed according to the
templates in the admin server

Step 10
Server name:=Name of the Admin server for this Domain
Listen Address:=ALL Local address to including all the virtual address
which had been specified
Listen Port:=7001
Enable SSl:= if we have the ssl certificate and we need to login with
the https then we can enable the ssl

Step 11
Provide the Node manager username and
password ..and select the Per Domain Node manager or we can configure the Node
manager later after finish the complete configuration

Step 12
Create the managed server with the necessary details
Server Name:=Managed Server Name
Listen Address:=All Local Address
Listen Port :=<No of the Port where the managed server will be
Listened >
Enable SSL:=tick the check box if you have the ssl certificate
SSL Listen Port:=SSL Port if SSL is enabled
Server Groups:=Select from two different server groups according to the
application deployment

Step 13
Add the cluster with the cluster name [In this cluster all the
managed server will be placed] we can create multiple cluster for a domain

Step 14
Place the managed server's in the cluster if we have multiple
cluster's then place the managed server according to the Project design

Step 15
Specify the Coherence cluster name and the listen Port If the Coherence
is enabled

Step 16
Name:=Physical Host name [or] Virtual Host name of
the server
Enable Post Bind GID:=Click the tick box
Post Bind GID:=Nobody is the default value[we need to specify the Group id of the primary group which is associated with the weblogic o/s owner
Enable Post Bind Uid:=click the tick box to Enable the Post Bind UID
Post Bind UID:=Provide the User id which owner's the Web logic Binaries
Node Manager Listen Address:=Local Host
Node manager Listen Port :=5556[Default but we can give the port number according to availability]
We can create virtual ip's and virtual host name for deploying the admin server and managed server [1]as the virtual host name are not associated with any of the physical hardware of network[Ethernet] the failure of ethernet card will not have huge effect on the virtual host names..
[2] In future we need to scale the Web logic managed server in to another physical server it can be easily packed and unpack in the new server as the managed server are not associated with any of the physical server

Step 17
Assign the servers to the machines as the better Practice if you have
the less managed server then assign the manged server in the separate
machines IF there are multiple managed server then assign one cluster's
managed server to one virtual host

In this env we have create the two managed server's and we have assigned
to the two different virtual host names and admin server is assigned to the
ADMINVHN virtual host name\
Step 18
We can select the library files and deploy accordingly to our necessity
in this practice we have selected the auto deployment [if we tick all the four
in the Step 9 then we need to deploy we have unchecked the deployment and the
services in the step 9 so it will be automatically deployed as per the template and
check the summary page

Step19
once the configuration process completes the 100 % then click the next
page

Step 20
Click Finish to Finish up the installation


Comments
Post a Comment